
Predict:
What do you think will happen? Why?
Turn to someone next to you. Tell them your prediction and your reason why.
Discuss:
What do you think will happen if we keep growing our plant without dirt? Why?
Discuss:
Where do you think these plants get the minerals they need to survive?
Discuss:
So if someone said to you, "Plants eat dirt," would you agree or disagree with them? What would you say to them?
Below are ideas for extending this topic beyond the activity & exploration which you just completed.
- End of Mystery Assessment and Answer Key
- Demonstration: Flower Soaking Up Water
- Reading: "Tomatoes at the South Pole"
- Activity: Dissect a Root
- Activity: Branches in a Leaf
- Activity: Grow Your Name
Flower Demonstration
Pass out the colored flowers.
Discuss: These flowers soaked up water that had been colored blue. Where did the water go in the plant?
Reveal answer
The plant soaked up the water all the way to the tips of its flower petals. You can tell by looking at the petals. You may be able to see colored lines in the petals and leaves. These are the tubes that carry water through the plant.
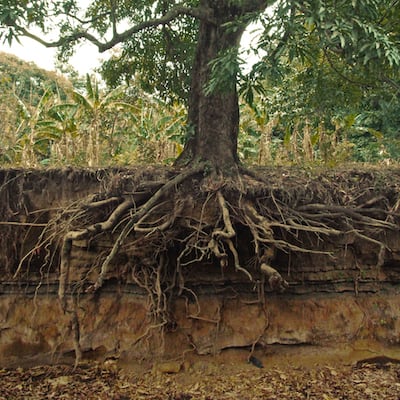
Extra Activity: Dissect a Root
Dissecting a radish root gives students a chance for careful observation. For instructions, see this sample lesson on roots from the University of California’s botanical garden. If you have time for an extensive examination of edible roots, you’ll find many ideas in this detailed lesson.
Extra Activity: Branches in a Leaf
If the demonstration of water traveling into a flower intrigues your students, you can give them a chance to examine this more closely.
Cut some pale lettuce leaves from a lettuce head and put the cut end in red or blue-colored water. (Butter lettuce works well.) Like the flower, the lettuce leaves will soak up the colored water, revealing a pattern of veins in the lettuce leaf. Have children draw the pattern of veins in a lettuce leaf. These are usually difficult to see, but the food coloring makes them visible.
You can do other experiments involving dyes in leaf veins.
Extra Activity: Grow Your Name
If your students are interested in growing plants in water (without dirt), try making a very simple hydroponic garden. All you need is a damp kitchen sponge or piece of cotton cloth, sprinkled with lettuce or radish seeds.
Your students can write their names in seeds, and watch them grow, following the very simple instructions from Tim Hunkin.