Scroll for prep

Please wait…
This video is having trouble loading. You may have lost your Internet connection.
Step 1: Click to Reload this page
Step 2: Click to
Try our other video player
Step 3: Contact your teacher if trouble persists.
Or,
dismiss this message.
CONVERSEMOS:
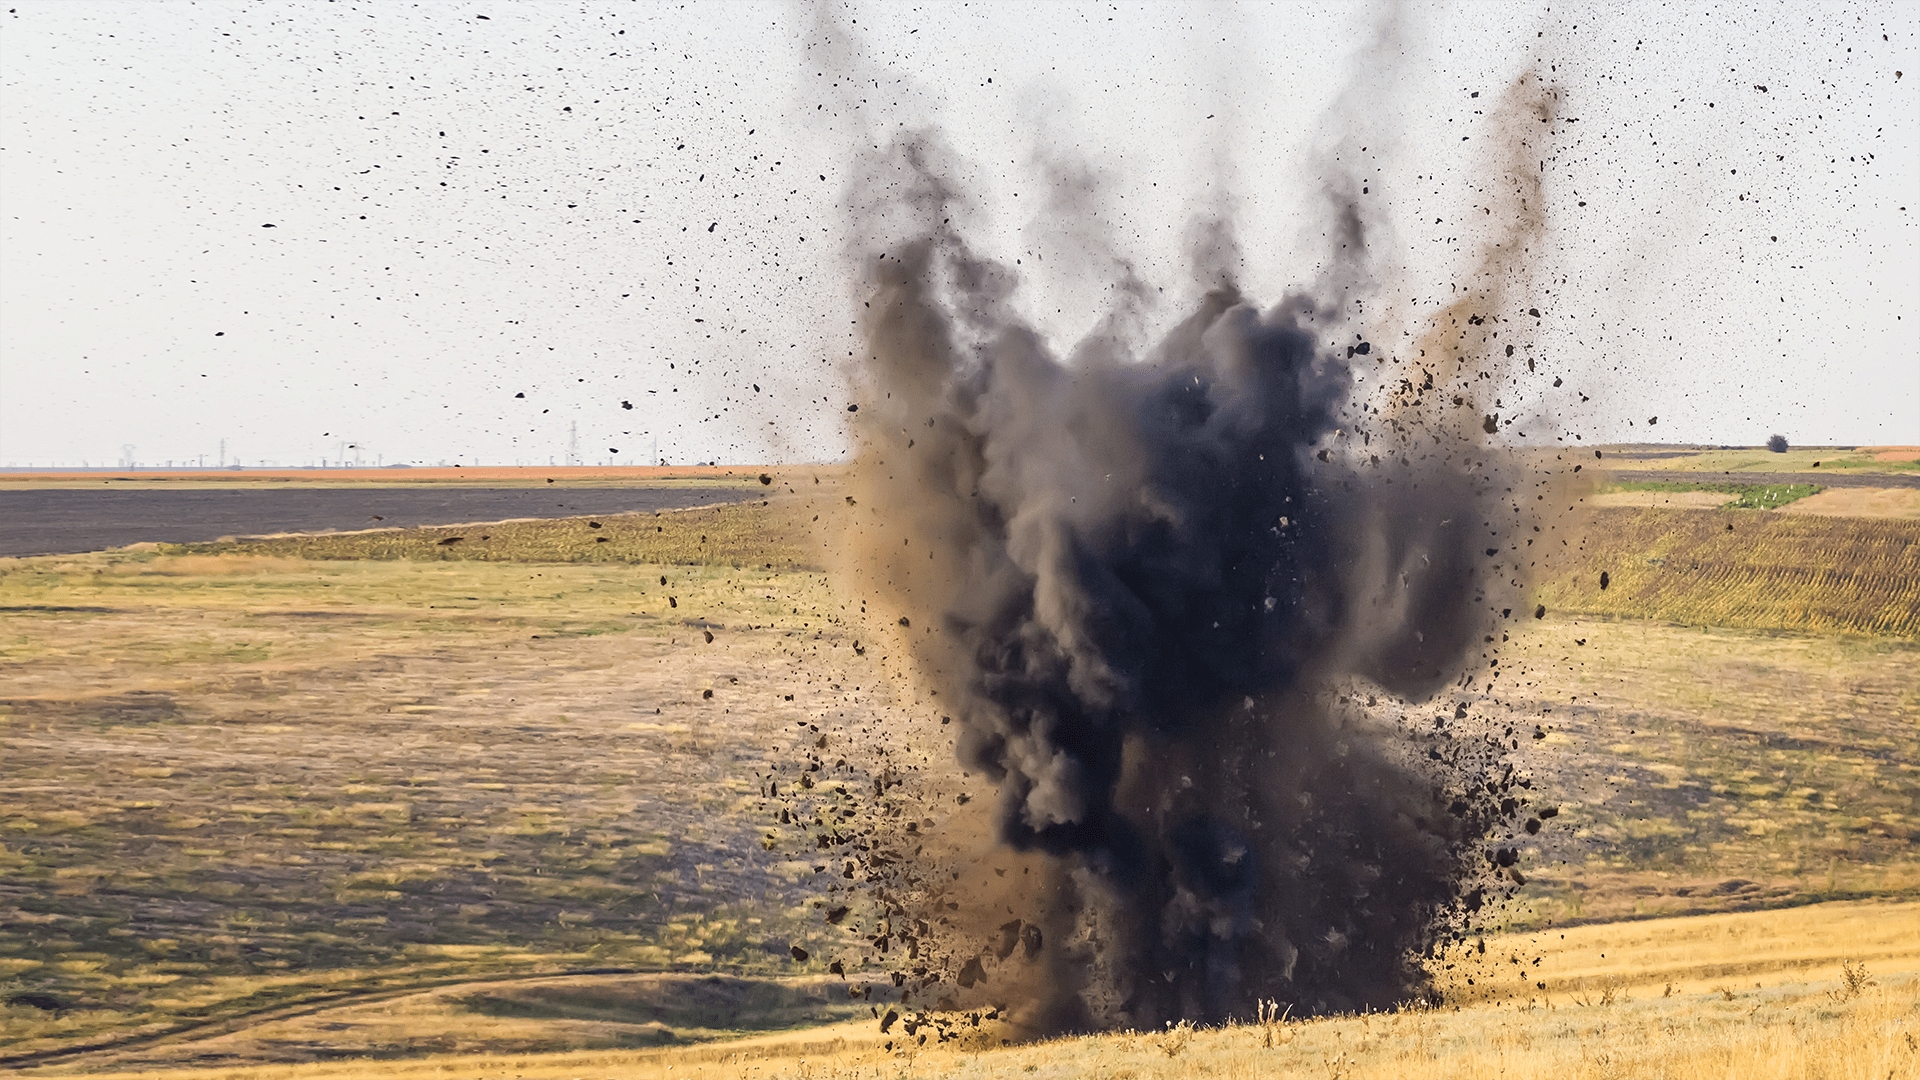
¿Qué hace que las cosas exploten? ¿Qué está sucediendo?
Please wait…
This video is having trouble loading. You may have lost your Internet connection.
Step 1: Click to Reload this page
Step 2: Click to
Try our other video player
Step 3: Contact your teacher if trouble persists.
Or,
dismiss this message.
CONVERSEMOS:
¿Por qué crees que los contenedores se rompían?
Please wait…
This video is having trouble loading. You may have lost your Internet connection.
Step 1: Click to Reload this page
Step 2: Click to
Try our other video player
Step 3: Contact your teacher if trouble persists.
Or,
dismiss this message.
Please wait…
This video is having trouble loading. You may have lost your Internet connection.
Step 1: Click to Reload this page
Step 2: Click to
Try our other video player
Step 3: Contact your teacher if trouble persists.
Or,
dismiss this message.
Paso
01/13
01/13
Encuentra un compañero o una compañera con quien trabajar.
Please wait…
This video is having trouble loading. You may have lost your Internet connection.
Step 1: Click to Reload this page
Step 2: Click to
Try our other video player
Step 3: Contact your teacher if trouble persists.
Or,
dismiss this message.
Paso
02/13
02/13
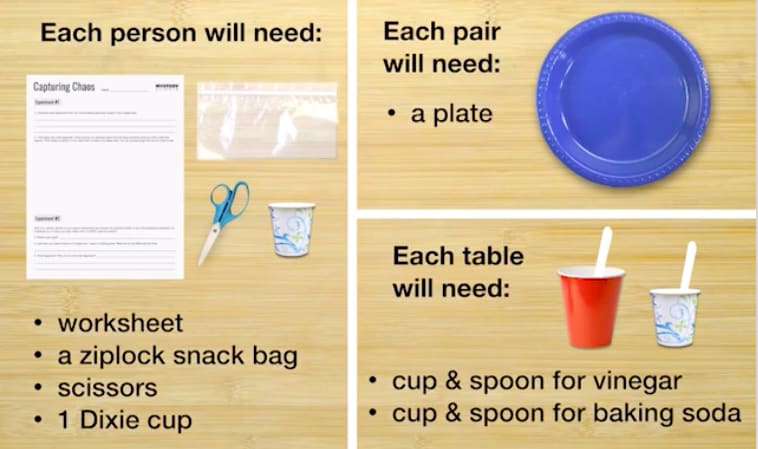
Obtén estos materiales.
Please wait…
This video is having trouble loading. You may have lost your Internet connection.
Step 1: Click to Reload this page
Step 2: Click to
Try our other video player
Step 3: Contact your teacher if trouble persists.
Or,
dismiss this message.
Paso
03/13
03/13
Conversemos:
Please wait…
This video is having trouble loading. You may have lost your Internet connection.
Step 1: Click to Reload this page
Step 2: Click to
Try our other video player
Step 3: Contact your teacher if trouble persists.
Or,
dismiss this message.
Paso
04/13
04/13
Decidan quién será el Dueño de la Bolsa y quién será el
Encargado del Vaso.
Encargado del Vaso.
Please wait…
This video is having trouble loading. You may have lost your Internet connection.
Step 1: Click to Reload this page
Step 2: Click to
Try our other video player
Step 3: Contact your teacher if trouble persists.
Or,
dismiss this message.
Paso
05/13
05/13
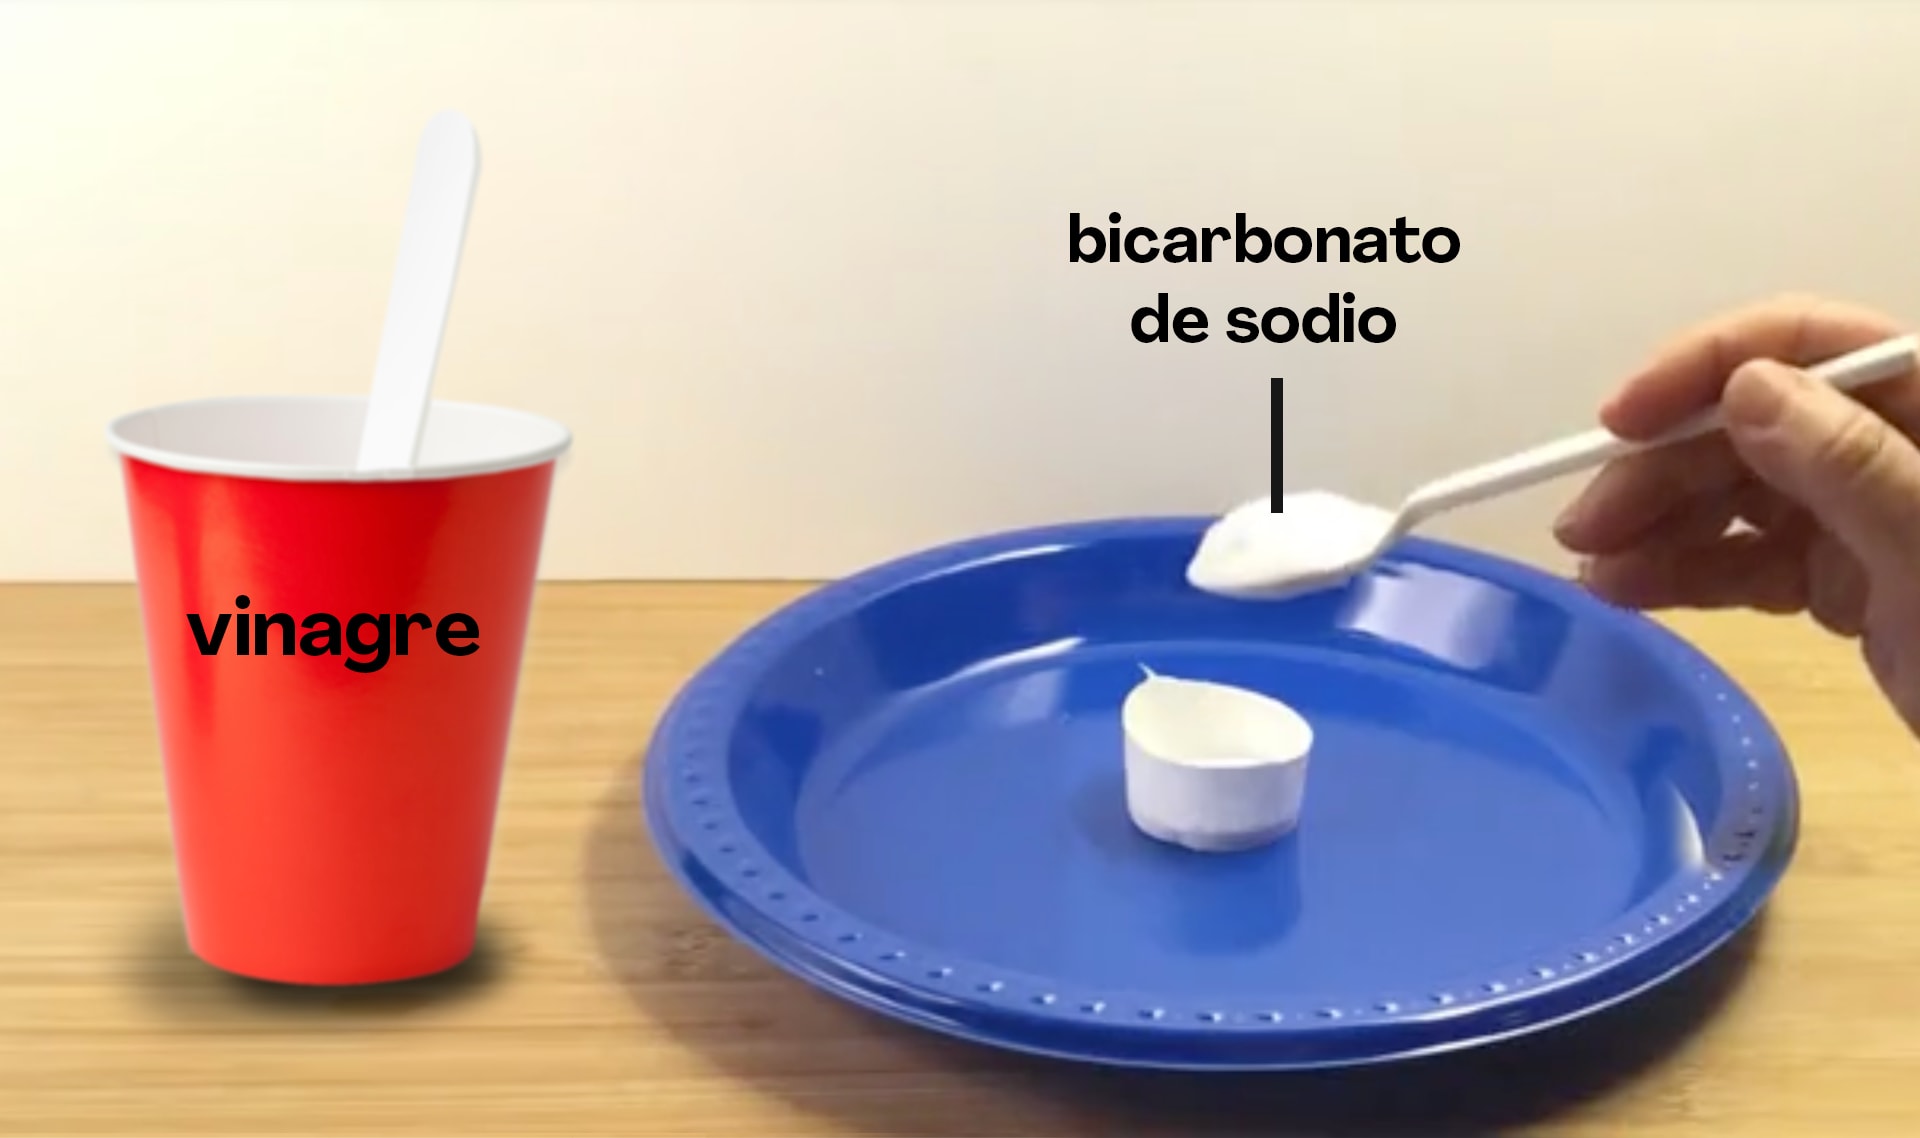
Encargado del Vaso: aplana el vaso y luego, córtalo.
Dueño de la Bolsa: pon una cucharada de bicarbonato de sodio
en el vaso.
Dueño de la Bolsa: pon una cucharada de bicarbonato de sodio
en el vaso.
Please wait…
This video is having trouble loading. You may have lost your Internet connection.
Step 1: Click to Reload this page
Step 2: Click to
Try our other video player
Step 3: Contact your teacher if trouble persists.
Or,
dismiss this message.
Paso
06/13
06/13
Dueño de la bolsa: mantén la bolsa abierta en el plato, así.
Encargado del Vaso: pon seis cucharadas de vinagre en la bolsa.
Encargado del Vaso: pon seis cucharadas de vinagre en la bolsa.
Please wait…
This video is having trouble loading. You may have lost your Internet connection.
Step 1: Click to Reload this page
Step 2: Click to
Try our other video player
Step 3: Contact your teacher if trouble persists.
Or,
dismiss this message.
Paso
07/13
07/13
Dueño de la bolsa: sigue manteniendo la bolsa abierta.
Encargado del Vaso: coloca el vaso con cuidado en la bolsa. Ciérrala.
Encargado del Vaso: coloca el vaso con cuidado en la bolsa. Ciérrala.
Please wait…
This video is having trouble loading. You may have lost your Internet connection.
Step 1: Click to Reload this page
Step 2: Click to
Try our other video player
Step 3: Contact your teacher if trouble persists.
Or,
dismiss this message.
Paso
08/13
08/13
Encargado del Vaso: fíjate otra vez que la bolsa esté bien cerrada.
Voltéala para que el bicarbonato de sodio caiga y, rápidamente,
coloca la bolsa sobre el plato.
Voltéala para que el bicarbonato de sodio caiga y, rápidamente,
coloca la bolsa sobre el plato.
Please wait…
This video is having trouble loading. You may have lost your Internet connection.
Step 1: Click to Reload this page
Step 2: Click to
Try our other video player
Step 3: Contact your teacher if trouble persists.
Or,
dismiss this message.
Paso
09/13
09/13
Platica con tu compañero o compañera sobre lo que sucedió.
Contesta la pregunta número uno en tu hoja de trabajo. Vas a
describir qué pasó.
Contesta la pregunta número uno en tu hoja de trabajo. Vas a
describir qué pasó.
Please wait…
This video is having trouble loading. You may have lost your Internet connection.
Step 1: Click to Reload this page
Step 2: Click to
Try our other video player
Step 3: Contact your teacher if trouble persists.
Or,
dismiss this message.
Paso
10/13
10/13
Esto fue lo que pasó en nuestra bolsa. Conversemos:
Please wait…
This video is having trouble loading. You may have lost your Internet connection.
Step 1: Click to Reload this page
Step 2: Click to
Try our other video player
Step 3: Contact your teacher if trouble persists.
Or,
dismiss this message.
Paso
11/13
11/13
Haz un dibujo que muestre por qué se infló la bolsa en la pregunta
número dos de tu hoja.
número dos de tu hoja.
Please wait…
This video is having trouble loading. You may have lost your Internet connection.
Step 1: Click to Reload this page
Step 2: Click to
Try our other video player
Step 3: Contact your teacher if trouble persists.
Or,
dismiss this message.
Paso
12/13
12/13
Contesta las preguntas número tres y cuatro en tu hoja de trabajo.
Vas a decidir cómo vas a cambiar el experimento.
Vas a decidir cómo vas a cambiar el experimento.
Please wait…
This video is having trouble loading. You may have lost your Internet connection.
Step 1: Click to Reload this page
Step 2: Click to
Try our other video player
Step 3: Contact your teacher if trouble persists.
Or,
dismiss this message.
Paso
13/13
13/13
Vuelvan a intentar el experimento. Describan sus resultados en la
pregunta número cinco en su hoja de trabajo.
pregunta número cinco en su hoja de trabajo.
Please wait…
This video is having trouble loading. You may have lost your Internet connection.
Step 1: Click to Reload this page
Step 2: Click to
Try our other video player
Step 3: Contact your teacher if trouble persists.
Or,
dismiss this message.
CONVERSEMOS:
En la parte de atrás de tu hoja, haz un dibujo usando un modelo de partículas para explicar por qué explotó la bolsa. (O puedes agregarle detalles al primer dibujo que hiciste).
Please wait…
This video is having trouble loading. You may have lost your Internet connection.
Step 1: Click to Reload this page
Step 2: Click to
Try our other video player
Step 3: Contact your teacher if trouble persists.
Or,
dismiss this message.
Please wait…
This video is having trouble loading. You may have lost your Internet connection.
Step 1: Click to Reload this page
Step 2: Click to
Try our other video player
Step 3: Contact your teacher if trouble persists.
Or,
dismiss this message.
Paso
01/10
01/10
Forma un equipo de cuatro personas. Si estás trabajando sola
o solo, necesitarás la ayuda de unos amigos o amigas.
o solo, necesitarás la ayuda de unos amigos o amigas.
Please wait…
This video is having trouble loading. You may have lost your Internet connection.
Step 1: Click to Reload this page
Step 2: Click to
Try our other video player
Step 3: Contact your teacher if trouble persists.
Or,
dismiss this message.
Paso
02/10
02/10
Decidan quién será el Líder del equipo y quiénes serán las
Partículas #1, Partículas #2 y Partículas #3. El Líder del equipo
también será las Partículas número 4.
Partículas #1, Partículas #2 y Partículas #3. El Líder del equipo
también será las Partículas número 4.
Please wait…
This video is having trouble loading. You may have lost your Internet connection.
Step 1: Click to Reload this page
Step 2: Click to
Try our other video player
Step 3: Contact your teacher if trouble persists.
Or,
dismiss this message.
Paso
03/10
03/10
Obtén tus materiales.
Please wait…
This video is having trouble loading. You may have lost your Internet connection.
Step 1: Click to Reload this page
Step 2: Click to
Try our other video player
Step 3: Contact your teacher if trouble persists.
Or,
dismiss this message.
Paso
04/10
04/10
Hay cuatro bolsas elásticas en la hoja de trabajo, una para cada
miembro del equipo. Líder del equipo: corta la hoja en cuatro
secciones y dale una a cada persona.
miembro del equipo. Líder del equipo: corta la hoja en cuatro
secciones y dale una a cada persona.
Please wait…
This video is having trouble loading. You may have lost your Internet connection.
Step 1: Click to Reload this page
Step 2: Click to
Try our other video player
Step 3: Contact your teacher if trouble persists.
Or,
dismiss this message.
Paso
05/10
05/10
Corta a lo largo de la línea gruesa para recortar el rectángulo.
Please wait…
This video is having trouble loading. You may have lost your Internet connection.
Step 1: Click to Reload this page
Step 2: Click to
Try our other video player
Step 3: Contact your teacher if trouble persists.
Or,
dismiss this message.
Paso
06/10
06/10
Dobla tu “bolsa elástica” así. Corta a lo largo de la línea de en
medio hasta llegar a la señal de “alto”.
medio hasta llegar a la señal de “alto”.
Please wait…
This video is having trouble loading. You may have lost your Internet connection.
Step 1: Click to Reload this page
Step 2: Click to
Try our other video player
Step 3: Contact your teacher if trouble persists.
Or,
dismiss this message.
Paso
07/10
07/10
Dobla tu papel a lo largo, así. Corta a lo largo de todas las otras
líneas punteadas, de esta forma.
líneas punteadas, de esta forma.
Please wait…
This video is having trouble loading. You may have lost your Internet connection.
Step 1: Click to Reload this page
Step 2: Click to
Try our other video player
Step 3: Contact your teacher if trouble persists.
Or,
dismiss this message.
Paso
08/10
08/10
Líder del equipo: estira una de las bolsas elásticas de esta
manera para asegúrate de que todo esté bien cortado.
manera para asegúrate de que todo esté bien cortado.
Please wait…
This video is having trouble loading. You may have lost your Internet connection.
Step 1: Click to Reload this page
Step 2: Click to
Try our other video player
Step 3: Contact your teacher if trouble persists.
Or,
dismiss this message.
Paso
09/10
09/10
Líder del equipo: sostén una bolsa así. Partículas #1: pon ambas
manos dentro de la bolsa. Todas las demás Partículas: también
metan sus manos.
manos dentro de la bolsa. Todas las demás Partículas: también
metan sus manos.
Please wait…
This video is having trouble loading. You may have lost your Internet connection.
Step 1: Click to Reload this page
Step 2: Click to
Try our other video player
Step 3: Contact your teacher if trouble persists.
Or,
dismiss this message.
Paso
10/10
10/10
Conversemos:
Please wait…
This video is having trouble loading. You may have lost your Internet connection.
Step 1: Click to Reload this page
Step 2: Click to
Try our other video player
Step 3: Contact your teacher if trouble persists.
Or,
dismiss this message.

Please wait…
This video is having trouble loading. You may have lost your Internet connection.
Step 1: Click to Reload this page
Step 2: Click to
Try our other video player
Step 3: Contact your teacher if trouble persists.
Or,
dismiss this message.
explosión
1 de 11
cuando algo sale volando
sustancia
2 de 11
un material con propiedades específicas
Please wait…
This video is having trouble loading. You may have lost your Internet connection.
Step 1: Click to Reload this page
Step 2: Click to
Try our other video player
Step 3: Contact your teacher if trouble persists.
Or,
dismiss this message.
reacción química
3 de 11
un proceso mediante el que una o varias sustancias forman una sustancia nueva
Please wait…
This video is having trouble loading. You may have lost your Internet connection.
Step 1: Click to Reload this page
Step 2: Click to
Try our other video player
Step 3: Contact your teacher if trouble persists.
Or,
dismiss this message.
estados de la materia
4 de 11
las distintas formas en la que se puede encontrar la materia: sólido, líquido, o gas
Please wait…
This video is having trouble loading. You may have lost your Internet connection.
Step 1: Click to Reload this page
Step 2: Click to
Try our other video player
Step 3: Contact your teacher if trouble persists.
Or,
dismiss this message.
líquido
5 de 11
un estado de la materia, por ejemplo el agua cuando se puede verter
Please wait…
This video is having trouble loading. You may have lost your Internet connection.
Step 1: Click to Reload this page
Step 2: Click to
Try our other video player
Step 3: Contact your teacher if trouble persists.
Or,
dismiss this message.
gas
6 de 11
un estado de la materia, por ejemplo, el vapor
Please wait…
This video is having trouble loading. You may have lost your Internet connection.
Step 1: Click to Reload this page
Step 2: Click to
Try our other video player
Step 3: Contact your teacher if trouble persists.
Or,
dismiss this message.
dióxido de carbono
7 de 11
un tipo de gas que las plantas ingieren y que los animales liberan al respirar
Please wait…
This video is having trouble loading. You may have lost your Internet connection.
Step 1: Click to Reload this page
Step 2: Click to
Try our other video player
Step 3: Contact your teacher if trouble persists.
Or,
dismiss this message.
oxígeno
8 de 11
un tipo gas que las plantas liberan y que los animales respiran
Please wait…
This video is having trouble loading. You may have lost your Internet connection.
Step 1: Click to Reload this page
Step 2: Click to
Try our other video player
Step 3: Contact your teacher if trouble persists.
Or,
dismiss this message.
partícula
9 de 11
algo pequeñísimo, a veces tan pequeño que no podemos verlo
Please wait…
This video is having trouble loading. You may have lost your Internet connection.
Step 1: Click to Reload this page
Step 2: Click to
Try our other video player
Step 3: Contact your teacher if trouble persists.
Or,
dismiss this message.
experimento
10 de 11
una prueba que se usa para descubrir más información sobre una pregunta
Please wait…
This video is having trouble loading. You may have lost your Internet connection.
Step 1: Click to Reload this page
Step 2: Click to
Try our other video player
Step 3: Contact your teacher if trouble persists.
Or,
dismiss this message.
modelo
11 de 11
una versión de mentiras de algo que los científicos usan cuando la cosa de verdad es algo demasiado grande, pequeño, o complicado para poder usarlo en sus estudios