In this unit, students explore the properties of materials and matter! They describe and classify different types of materials by properties like hardness, flexibility, and absorbency, and they investigate how those properties are useful in meeting basic human needs (such as clothing and cooking). They also investigate how heating and cooling affect the properties of materials.
In this lesson, students explore the different properties of materials used for clothing, such as texture, flexibility, and absorbency. In the activity, Mad Hatter, students use this information to design and build a hat that protects them from the Sun.
Each student will make their own hat, but groups of four students will share a cup of water for the Sweat-Soaker test.
Prepare Supplies
Cut a 3-foot length of string/yarn/ribbon for each student.
Tear off a 9” piece of aluminum foil for each student.
Fill each cup about halfway with water.
Optional: Provide a hand-held mirror so students can see their hats as they work on them.
Engineering Teacher Tip
We created the Hat Inspiration printouts for students who are stumped and frustrated by the task of making a hat. We suggest letting students try building on their own first, then providing these Inspiration Sheets only to those who may need additional help.
In this lesson, students consider the insulating and conducting properties of different materials. In the activity, Feel the Heat, students test different materials and determine which would make the best oven mitts.
We suggest students work in pairs and share water bottles in table groups of four. Homeschool students will need a partner for this activity.
You will need access to hot water for this activity. You can fill bottles an hour or two ahead of class if you have a cooler (or a cardboard box and a bath towel) to keep the water bottles hot.
Prep Aluminum Foil
Tear aluminum foil into 10” squares. Each pair of students (or each homeschool student) needs two 10” squares.
Fill the Plastic Bottles
Each group of four students (or homeschool student) needs two plastic bottles. Half of the bottles will be filled with cool or cold water and the other half will be filled with warm or hot water. The difference in temperature between the two bottles has to be enough to feel easily with bare hands. You can use ice water and warm water or you can use very hot water and cool water. You just need to make sure there is a definite difference.
You can keep your hot bottles hot (or your cold bottles cold) for a couple of hours if you put them in a cooler or in a cardboard box with bath towels as insulation.
In this lesson, students learn about melting, about the solid and liquid states of matter, and then discover why plastic was invented. In the activity, Candy Melt, students conduct an investigation to determine which types of candy melt in hot water. Using their observations, they decide which candy is the best choice to bring to a hot summer camp.
We suggest students work in pairs for this activity. Homeschool students can work alone, but will need to test all the different types of candy on their own.
You will need a source of hot water for this activity and a way to keep the containers of hot water warm. You can either use a cooler or create your own insulator using a cardboard box and bath towels.
Prepare the Candy
You need to fill the Ziploc bags with candy before class. This will take about 20 minutes.
Count out one Ziploc bag per student.
For half of those bags, put 12 chocolate chips (or a small square of chocolate) in each.
Divide the remaining bags into three groups: “A,” “B,” and “C.”
Put a few pieces of Candy Variety 1 with a low melting point (gummy bears or gummy worms) into each “A” bag. Put a few pieces of Candy Variety 2 with an intermediate melting point (Starburst, caramels, or butterscotch chips) into each “B” bag. Put a few pieces of Candy Variety 3 with a high melting point (jelly beans, gumdrops, or Swedish Fish) into each “C” bag.
When you hand out the Ziploc bags to your students, make sure that each pair of students gets a bag of chocolate and a bag of either group “A,” “B,” or “C” so they can compare the melting point of chocolate to one of the other candy types.
Note: For a fair test, try to keep the amount of chocolate and candy in each bag consistent.
Homeschool students will need 4 Ziploc bags. One bag with chocolate chips, one with high melting point candy, one with medium melting point candy, and one with low melting point candy.
Prepare the Hot Water
When students do the activity, the water needs to be hot to the touch — a little above body temperature. You can fill the containers with hot water up to 3 hours before you do the activity, as long as you have a way to keep them insulated.
Start with water that’s hot enough to make a cup of tea (about 180° F or 82°C).
Fill each container about halfway with the hot water. Place the lid on top of each container.
Put the containers in a cooler (or line a cardboard box with some thick bath towels and wrap the containers up to keep them warm).
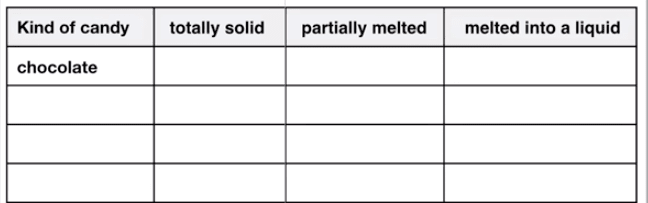
Prepare the Results Chart
At the end of the activity, we suggest that you gather all student results from their Candy Melt experiment and record it on the board for everyone to see. Below is an example of the chart that you can write on the board either before class or while the Exploration video is playing.
In this lesson, students learn how new materials are invented. In the activity, Bouncy Glass Inventions, students come up with ideas for inventions that use an exciting futuristic material: glass that bounces and stretches like rubber!
You will need access to a large dry-erase board or chalkboard where you can record student ideas.
We encourage students to think “outside the box” and come up with wild ideas.To prepare yourself to lead the class discussion, we suggest you watch this short video of a creative team coming up with ideas.
In this lesson, students examine how large structures like houses are built from smaller pieces. In the activity, Paper Towers, they design their own structures using an unconventional building material: paper! Students build towers using 3" x 5" index cards and paper clips. First, they build tall towers, then they are challenged to build towers strong enough to support a hardcover book.
Each student will create their own paper tower, but we suggest students work in pairs to share ideas.
Each student will need a flat, level area where they can build a tower without bumping into someone else’s. Desktops and tables are great. Floor space works as long as you have a hard surface. We don’t recommend building towers on a carpet.
Lesson 6: Invention & Innovation
No materials required.
This episode is locked
Invite 5 or more friends and we'll unlock all previous episodes as a thank you!
Locked
6:10
Why is the sky blue?
Locked
4:41
Why do we call them doughnuts?
Locked
5:16
Could a turtle live outside its shell?
You are using an unsupported browser. For the best experience using Mystery Science,
we recommend upgrading to one of the following browsers: